Sunday, June 27, 2010

One Year Anniversary


Yesterday Brian and I celebrated our one year wedding anniversary. I can't believe how quickly the year went! But we enjoyed every day of it. To celebrate we spent the weekend in San Diego, which was a great little get away. Last year we decided not to save and freeze the top of our wedding cake, but instead to get a new little one made this year. So I ordered an eight inch round, white cake, lemon curd filling with butter cream frosting from French's Cupcake Bakery in Costa Mesa, same place as our wedding cake. I had them decorate it the same way too and it turned out perfect. The frosting got a little smudged on the drive down to San Diego, but it was such a fun dessert to share on our anniversary. So in celebration of our one year anniversary, I'm posting up pictures of our wedding food. It was such a perfect day.


Wednesday, June 23, 2010

Tres Leches


I've only had tres leches cake a handful of times, but have been dying to try one of my own. The tres leche name comes from the three milks that are poured onto and soaked up into the cake: evaporated milk, sweetened condensed milk and cream. I love cake that gets soggy from ice cream, or soaked up in a nice syrup or sauce, so this cake is right up my alley. Toped with some home made whipped cream, and tres leches is a melt in your mouth kind of cake. I took this to my father-in-law's father's day dinner last week and it was a huge hit. Everyone wanted the recipe. I got the recipe from the Pioneer Woman, so I'll send you over there to look at her step by step pictures (especially since I didn't have my camera during the first half of the cake making).

I found, after making the cake, that you don't need to turn the cake out on to a platter to pour the milk in. I didn't have a square platter that would fit the cake, so I just used a larger ceramic pan. But you could easily just keep it in the original pan, poke holes in the top, pour the milk onto the cake, and then frost. It probably looks a little better on the platter, but the taste will be exactly be the same, delicious! And this cake is pretty easy to make, but you do use your mixer a lot, to beat egg whites, egg yokes and again for the whip cream. This is one of those recipes that I wish I had a second bowl for my stand mixer. (Found out it's on sale at Macy's I'm headed over there today!) If you think you will would like this cake, give it a try, you will!

Tres Leches Recipe


Tuesday, June 22, 2010

Father's Day Cookies


I spent Father's Day afternoon making and decorating sugar cookies(Recipe here) with my sister's step kids! They made quite a mess, but were very creative in in their decorating. Here are some pictures of the days activities. The Dads loved them!


Friday, June 18, 2010

Just an Idea


I don't know if you're a messy cook like me, but my kitchen is pretty much a disaster when I'm done. And caught in the crossfire of flour and egg whites is my recipes. I'm quite confident I don't have one card that doesn't have something spilled on it. Since a lot of my recipes are coming from the internet lately, I have been printing them out and putting them in sheet protectors. This has been a great help. They still get super dirty, but now I can wipe them off and put them back into their binder and the won't stick to the pages next to them. But along with my messy recipe problem is my where do I put the recipe so I can see it the whole time I cooking problem. They always get buried under the next ingredient I take out. I know they have those fancy shmancy recipe holders, but one more thing on my already crowded counter is not the answer for me. So I was looking around my kitchen and I saw my OXO magnetic clips. I love these for so many reasons: they clip the tops of chips, cereal, and large bags of chocolate chips I buy at Costco, hang my oven mitt to the side of my fridge, and most currently, hang my recipes up when I'm cooking! (This started out as a post about a new way to hold recipe but now seems to be an advertisement for OXO magnetic clips!) Anyway, I put my recipe in the clip, hang it to my microwave's medal side, and it is up, out of the way, so I can view it the whole time I'm cooking. It stays clean, but most of all is easy to read so I don't make any mistakes! Just a thought, if you're looking for new ideas.

Buy OXO Clips through these links:
OXO.com
Target
Bed Bath and Beyond


Thursday, June 17, 2010

Congo Bars


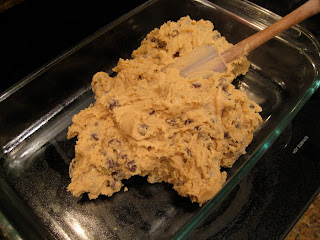
Last night I was supposed to go to a concert with my sister and two brothers. But when Brian came home early from class I decided that I'd rather stay home with him, bake some treats, and go to bed early. They probably think now I'm old, married and boring, but hey, I'm ok with that. And as a result of my night in, I tried a new recipe! I came across this recipe on the Bakerella website. She posts about all kinds of things you can bake, but she's most famous for these. (She taught Martha how to make them on her show!) I'll be trying some of those soon. I seem to be in a bar mood lately, so I thought I'd give these a try. It's similar to recipes for blondies, and you can add whatever you'd like to them. She gives some other suggestions on her site. I just used chocolate chips and added chopped walnuts to only half.

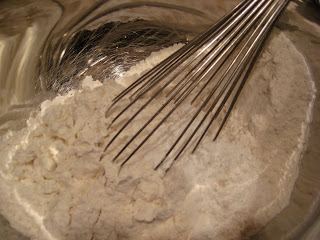
About the recipe: She gives two options for mixing, by hand or with a mixer. She said she liked the texture of the hand mixed better so I went with that. But I've only made them the one way, so I can't really compare the two. She did mention that that taste was the same, so you choose. As for sifting the dry ingredients, I went with my moms method. If there is a better, faster, easier way to get things done, she'll find it. So for sifting dry ingredients she just gets out her wire wisk and wisks away. It works just as well and is very quick.

Bakerella's suggested baking time is 30 minutes, but mine, and others who commented on the recipe, weren't done at 30. I just kept checking them about every two minutes, and eventually after about eight more minutes they were done. You can check them with a toothpick to see if they are done. She mentioned not to over cook them, and I think I could have cooked them a little less, but I didn't want to cut into a big gooey mess. Next time I might try cooking them in a jellyroll pan or something larger so they are not quite so thick, might help with the baking time. But all in all they were easy to make, don't require special ingredients and a very tasty treat!

Bakerella Congo Bars Recipes


Monday, June 14, 2010

Lemon Blueberry Bars


When my Mom started reading cooking blogs she happened upon the Cookie Madness lady. Mom was super impressed that the cookie madness lady whipped up a new batch of cookies daily. Sometimes she would make more than one batch if she was trying to perfect it! I don't read her too often, but I checked in the other day, while the students were working hard, and I stopped dead in my tracks when I saw these little lovely lemon blueberry bars. I had just bought blueberries for some muffins that never materialized and wanted to use them up. And of course, I'm a major lover of all things lemon.

I actually made this recipe on Saturday while I was doing all my waiting around for these to cool. And I was so thrilled when I read through the recipe and I found out I got to use my food processor. Believe it or not I haven't used it once since I got it for Christmas. Sad, I know. But I guess I just got so use to improvising, I put it in the garage and sort of forgot I had it. But that thing mixes and chops like a champ. I'm so excited! I'm going to need to gather some recipes that specifically call for a food processor.

Anyway,this recipe is straight forward, easy to follow and the outcome is to die for. However, I didn't end up using all the mix for the crust, I didn't put too much of it on top. And I think next time I would make my bottom crust a bit thinner. I would have liked more lemon filling and blueberry and a little less crust. (My family members agreed.) Next time I might also try doubling the lemon, sweetened condensed milk mixture. I think the bars would be great with a thicker filling. Pay attention to the recipe when they say they are better the longer they sit in the fridge. They are amazing cold. We kept them in there until they were gone, a whole 24 hours. This makes a 9 X 13 inch pan, and I cut them into small squares. They are a bit crumbly and make a slight, but worth it mess, when you bit into them! Try them, thank me (and the cookie madness lady) later! Pictures and recipe below.

Lemon Blueberry Bars Recipe

The crust:


Lemony Goodness


Sunday, June 13, 2010

Coconut and Chocolate Fudge Bars


So the no posting thing has been because of the no cooking thing! And oh how I've missed it. I've had my eye on the school year ending and looking forward to summer where I can devote more time to cooking, baking and other things I love. This week was the last week of school, and while my students were being entertained by projects I would not be grading, I had some time to search around the internet for new food blogs and recipes. I happened upon The Pioneer Woman's blog and her Tasty Kitchen blog. Both of these are filled with recipes and pictures that will want to make you drop everything and get in the kitchen. If you're not familiar with these two blogs, just real quick, The Pioneer Woman is quite amazing. She blogs daily about food, photography, her daily life and homeschooling. The Tasty Kitchen is a separate page, she created, where anyone can post up a recipe to share. (But I'm sure most of you know who she is, she's wildly popular.)

So I happened upon a recipe for coconut and chocolate bars over at the Tasty Kitchen. In the introduction to the recipe the author compares to them to Almond Joy candy bars. Sold! And lately Brian and I have been loving us some coconut. The recipe is simple to follow. It only makes a 8x8 pan, so not a huge serving. But that's ok because they are really rich. I cut them into pretty small pieces and they go well with a tall glass of milk or water. Also, it says prep time is 20 minutes, and cook time is 45 minutes. But in there you have to wait about an hour for the crust to cool and another two hours to cool after baking the fudge, before cutting, so be advised. (I actually made some other bars while I was waiting. I'll post those tomorrow!) I made these Saturday afternoon and we didn't cut into them until about midnight. We were out and about for a while, but mmmmm, what a great late night snack!

Here are some pictures from my baking, and a link to the recipe. Try these, I'm pretty sure you'll be thanking me! I've got rave reviews from everyone who has.

Making the crust:


Making the chocolate fudge:


Chocolate & Coconut Fudge Bar Recipe
Related Posts with Thumbnails