Sunday, December 26, 2010

Christmas Ornaments

Crate and Barrel, 2010
When my mom started having her children she started a tradition to buy us a new Christmas ornament each year. When we were younger we would usually just pick out the ornament we liked the best. But as we got older and started having hobbies and went on exciting trips we would collect ornaments that had to do with those hobbies and from our travels. As her children got older and weren't getting married, our Christmas tree was very crowded, with each child having 20 plus ornaments on the tree, with my youngest brother, Jeff, having his tiny hand print and poem front and center. When I did finally get married last year, I had 30 ornaments to take and decorate my own tree with. Each year, as I carefully unwrap and hang each ornament on the tree I am reminded of each story and memory that goes with it. Our ornament boxes are decorated with quotes, and memories of the goings on that year. Decorating my Christmas tree, either with my family or my husband, is my favorite Christmas tradition. This little trip down memory lane is worthy of this blog post because this year I got my first cooking ornament! I thought it was about time. I got these cute ones from Crate and Barrel and gave one to my mom.
Homemade Williams-Sonoma, 2010
I also had this little decoration from my birthday present from Brian. He bought it and had it wrapped at Willams-Sonoma. I cut the green ribbon from the package, tied it to the decoration and instant ornament! I hope you all had a very merry Christmas. Mine sure was fabulous.
Here are a few highlights from my tree:
Gondola from Italy, 2007
Big Bird, 1981, Tucan from Costa Rica 2010
Wedding Bride and Groom, 2009
Hand painted from Puerto Rico honeymoon, 2009
First ornament I bought Brian, 2008

Ballet slippers, 1988

Christmas Star Sugar Cookies

The other day my husband, Brian, was talking about his best friends mom's sugar cookies and how she used the soft, creamy frosting and they were his favorite cookies growing up. He mentioned that I was always using the "hard" frosting, and while they looked pretty, they weren't as tasty as the soft frosting. Now I can't have my husband dreaming about someone elses cookies, or be shown up by some childhood cookie dream,  so for my Christmas cookie platter I decided to put the royal icing and fancy cookie decorating aside and use plain old frosting and sprinkles to top my Christmas star sugar cookies, all in hopes to win my husband back!

I think my plan worked, and I will admit I do love the soft frosting better than the royal icing, as far as taste goes, but there is no comparison with the decorating. It's impossible to decorate a cookie with non royal icing as well as with royal icing. Note the photos, my cookies have looked better. So you must choose. Taste or looks, and for a husband who prefers taste to looks I was glad I could make him a Christmas cookie that I hoped rivaled those of his childhood dreams.

Sugar Cookie Frosting
1 pound box powdered sugar
6 Tablespoons butter
1/4 cup heaving whipping cream
1 1/2 teaspoon vanilla
Food coloring

(Add more cream to thin, or powdered sugar to thicken.)

Thursday, December 23, 2010

Butter Toffee

 
As it is two days before Christmas, I should be sitting on my couch writing this by the glow of my tree, Hallmark Christmas movies playing it the background and the house smelling of every kind of Christmas goodies. Notice I said should, not am. Instead, I'm sitting at my kitchen table, which is piled with junk, listening to a loud carpet cleaner and smelling the strong stench of cleaners that are trying to undo the musty smell coming from my wet, soggy carpets. Crazy, right? Turns out, not only do Southern Californians not know how to deal with the rain, but apparently my house wasn't build for it either. We've had a week of straight rain, and it all decided to somehow get under our house, through cracks in the cement, and soak our carpet and pads, creating a nice moldy/musty smell. I'm not surprised, as this same thing happened last year, but I'm quite mad that my landlord didn't fix it all the way last year. Anyway, hopefully it will all be taken care of by today, temporary fix anyway, and Brian and I can have a cozy Christmas morning here.
{Thanks Eduardo for helping me with this mess!}
Now that I got that out of my system, on to the butter toffee. I did a majority of my Christmas baking on Monday, before my house was torn apart. I was for sure making caramel, but thought why not give toffee a chance too? After all I already kind of did it once when I was experimenting with caramel, and this recipe made it look super easy. It totally was a no brainer. As long as you have a candy thermometer that works (see caramel post for my sad story) and a strong hand to stir with I'm sure you can make this work. I actually made this right before the caramel, and my thermometer managed to stay attached to the pot.

This is called butter toffee, I'm assuming, because of the 16 ounces of butter it calls for. That's four cubes! And the only other ingredients are water and sugar. The recipe is written in weight, and because I don't have a food scale (I know! Shame on me!) I did some research and some calculations to figure out how to measure using measuring cups and spoons. My toffee turned out amazing, so I'm thinking these measurements worked out just fine. (Listed below)

For the chocolate I used the Wilton baking chips, my go to chocolate. I would have loved to use some good quality candy making chocolate, but I already had these, so I figured I'd just use them and they worked out great. And they are so easy to melt, you don't really have to temper them. But they key to melting these is to not let them melt entirely in the microwave. Take them out every ten seconds or so and stir, and then remove them when there are still chunks of chocolate. Continue to stir and the hot chocolate will melt the rest of it. That way you don't get white, streaky chocolate. It tastes the same, just doesn't look so pretty.

I poured the toffee onto parchment paper in a cookie sheet. I had enough to do one full sheet and maybe half of another. I couldn't spread it as thin as the recipe says to because I didn't know it would fill the pan so much. But it didn't matter. One pan I put chocolate on the top and bottom, and the other just on the top. And I topped some of it with chopped walnuts.
Everyone I've given this too has loved it. I'm putting the rest of the toffee on my cookie platters for Christmas day dessert. It's going to look really pretty!

Butter Toffee Recipe from Pioneer Woman

Butter Toffee Recipe
(My measurements based on measuring cups and spoons, not weight)
4 cubes of butter,
2 cups + 4 Tablespoons Granulated Sugar
1/4 cup + 1/8 cup water
1 teaspoon salt
1 teaspoon vanilla
2 bags Wilton baking chips, dark chocolate

*Necessary Equipment: Candy Thermometer*
Combine butter, sugar, water, and salt in a saucepan. Bring to a boil, stirring constantly.
Cook over moderate heat, stirring gently, until candy thermometer registers 298 degrees.
Remove from heat and stir in vanilla until well combined.
Pour the mixture onto a silicone baking mat or good parchment paper. Use a heatproof rubber spatula or offset spatula to spread quickly before the toffee sets. Spread thin.
Allow toffee to cool completely. Blot to remove excess oil from the surface. Coat surface with half of the melted chocolate and immediately sprinkle with topping.
When chocolate has totally set, carefully flip over (it’s okay if it falls apart a bit) and coat other side with the rest of the chocolate. Sprinkle on topping.
Allow to set, then break into bite-size pieces.
Store in an airtight container.

Wednesday, December 22, 2010

Caramel

{Sprinkled with sea salt}
Homemade caramel is so tasty. Quite a few years back, when I was still in college I was introduced to this recipe around the holidays and took it home to my mom and had her help me make it. It's not that I think making candy is hard, but it was my first time, plus I love making stuff with Mom. The first time we made it we ended up cooking the candy mixture too long and instead of soft, chewy caramels, we got hard, crunchy toffee. Although not what we were going for, it sure was tasty. We knew we were on to something, we just needed to try again. We didn't get around to trying again until the next year. We over compensated a bit too much for the toffee texture of the previous year, and went for the soft ball texture. Turns out that is not what we wanted either. The caramel would hold it's shape as long as it was cold and in the fridge, but as soon as it reached room temperature it was oozing all over the plate. But once again, it tasted amazing, despite the lack of firm texture. (We should have dipped apples in it!) I had even dipped some of the caramels in chocolate while they were cool, but once they warmed up they broke through the chocolate shell and came oozing out!

It's been about three or four years since that last caramel incident, and I consider myself much more experienced in the kitchen now, so I thought it time to try again. With my mom out sailing the Florida Keys right now, I was on my own. So I did some research on what temperature to cook caramel to, was it soft ball or hard ball? No one really said, but I thought I had a handle on things and took my new Sunbeam candy thermometer out of the packaging. The thermometer came with a little case that had suggested temperatures for cooking candy to the different stages. And then, there it was, not hard ball or soft ball, but right in between, firm ball. The answer to my past two caramel let downs. Firm ball is between 240-250 degrees F. I was beyond thrilled at my new discovery and loving my new thermometer.

So off I went, stirring the sugar, Karo syrup and cream until my hand went numb. All the while carefully watching my thermometer making sure to get it at the right temperature. I decided, after reading a few blogs, I would stop cooking at 248 degrees. I had to keep wiping condensation off the thermometer so I could, again, make sure not to miss my rising temperature reaching the perfect cooking point. While I was stirring away my aunt called, so I pick up and start talking, and stirring, and then all of a sudden my, no longer favorite, candy thermometer broke loose from the clip holding it to the pan, and the clip and thermometer fell into the pot of boiling sugary syrup. After a few seconds of trying to figure out what to do, I quickly got off the phone, dug some tongs out of the drawer and fished out the thermometer and clip. But now what? The thermometer was covered in an almost caramel substance that was starting to harden and I couldn't see the temperature. So I get a paper towel and try to wipe it off, but the paper just starts to stick to the sticky, almost caramel covered thermometer. (This is so something that would happen to me.) I did manage to take the pot of caramel off the hot stove so it didn't burn while I was dealing with all this. So finally, I managed to get the thermometer cleaned to where I could read it, although it was difficult because the caramel was so hot! I put the pot back on the stove and cooked it to what I think was 248 degrees.

I'm not sure if the interruption in cooking did anything to the caramel, but this year it actually turned out. I cut it, left it a room temperature, dipped it in chocolate, wrapped it in wax papers and it managed to keep its shape. It's still on the softer side of caramel and perhaps it will just take more tries to get it 100% right. But no matter what the texture has been, this recipe always produces a very tasty caramel.

Caramel Recipe
In a large pot mix:
2 cups sugar
1 cube butter
1 3/4 Cup karo Syrup
1 cup heavy cream
Turn heat to low until butter is melted. Then turn up heat to boil.
When mixture boils add:
1 cup heavy cream
Continue to boil until mixture reached firm ball stage around 248-250 degrees F.
Take off heat and add:
1 teaspoon vanilla

Have a Tupperware or glass pan buttered or lined with parchment paper, you can butter the parchment paper too, pour mixture into pan to cool. (I put mine in the frigde)
To serve cut into squares, use a knife or buttered pizza cutter. You can sprinkle with sea salt, wrap in wax paper or dip in chocolate

{A little bit of caramel oozed out, but they didn't break the shells}

Tuesday, December 21, 2010

Snowflake Sugar Cookies

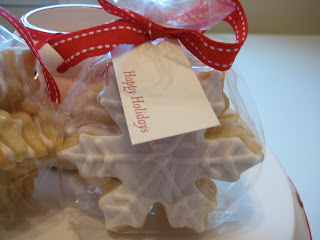
I think these are the only sugar cookies I'm going to get to this season. Which is ok because they turned out so cute. I did have a ton of other ideas I wanted to try, but they will have to wait until next year. I made these for a friend who requested ten treat bags to pass out to his neighbors. Isn't he sweet? I loved the white cookies with the red ribbon and tag. I hope he and his neighbors like them. Making them was a little bit of a process though because I was having some trouble  getting the frosting to the right consistency. If you can do that, the piping and decorating is so much easier. I finally settled for a consistency that would work, but it was still a little runnier than I would have liked. I need to work on that skill. After I got the frosting figured out, I tried something new with these. I outlined the cookie, did maybe five or six, and then went back and filled them in while the outline was still wet. By filling them in while wet you don't get the border around the outside of the cookie, which I have decided I like better. I still used a thicker frosting to pipe and a thinner frosting to flood.

Another thing I loved about making these cookies is that they are white. I love not having to color frosting. Not having to mess with that makes these cookies all the more my favorite. Snowflakes are all different and imperfect, so I took that approach with these. They didn't need to be perfect, just sweet, snowy and white. I so wish it snowed in my part of California. Well, maybe just for Christmas!

Saturday, December 18, 2010

Chocolate-Coconut Cheesecake Squares

A few weeks ago I mentioned that I went to a cookie exchange. I enjoy a good cookie exchange for a couple of reason. First, you get a variety of cookies to give out, or enjoy yourself, without having to make a bunch of different recipes. But what I really like most is just trying everyone's different cookie recipes. It takes the guess work out of debating whether or not you should make a recipe yourself. You taste it and then you know. This year we voted on the best cookie. (Had I know that before going I might have thought a little bit more about what cookie to bring!) The winner was these tasty little chocolate-coconut cheesecake squares. They got my vote, they were seriously so good. They reminded me of the chocolate coconut fudge bars I made this summer, but the cheesecake put these over the top! I will caution that they are very rich, so heed the advice to cut them into one inch squares.  When I brought mine home and refrigerated them I liked them better cold, but room temperature is fine.  Even though I haven't made these, yet, I have tasted them and totally approve, so I wanted to share them with you for your holiday baking. They are on the top of my to bake list, and with my two week vacation just starting, I have a good feeling I'll get to them. Enjoy.

Chocolate-Coconut Cheesecake Squares

Tuesday, December 14, 2010

Apple Cream Cheese Danish

Christmas morning is usually the big pastry holiday in our house, but this Thanksgiving I decided to make my own pastry. Last year my mom made too big of a breakfast and a lot of us remember not being as hungry for the main feast as we would have liked. I came across this blog post on Annies Eats and I knew it was time for me to try my first pastry. She adapted the recipe from Baking Illustrated and her step by step instructions make it look really easy. But it doesn't only look easy, it really was easy! It does take a while though, I started it the day before, but I repeat, it is easy. To make the dough you have to fold, and turn, and kneed in butter, and refrigerate and do it all over again a few times. So it does take some advanced planning, like I said, I did it the day before I wanted to cook it. But all that time is so worth it. This was delicious. I made two. Well actually I made one and Garrett made one. But that still wasn't enough to feed our big breakfast crew. The cream cheese was a great addition to the apple filling, but I did make part of it with just apples. Our favorite Christmas pastry is pineapple cream cheese, and I can't wait to make this again and try that and other fillings. I'm posting my pictures below of how to assemble the danish after the dough is made, but visit Annie's site for great step by step instructions for the whole process.

Apple Cream Cheese Danish


Monday, December 13, 2010

How to Cut and De-Seed a Pomegranate

 Pomegranates are very interesting little fruits. Well, I guess they're not too little, but their delicious seeds you eat are pretty little. The first time I saw someone eating a pomegranate, that I can remember,  was in my high school biology class and this girl was making the hugest mess. I'm not sure we were even allowed to eat in class, but she had this weird fruit all wrapped up in this paper towel and her hands were dyed red. I could not figure out what she was eating, and it didn't look very easy to do. Fast forward to a few Christmases ago, when my brother Garrett was on this pomegranate kick. Not sure where he learned how to properly de-seed the fruit, but he clearly had a better handle on it biology girl. Every Christmas since we've had a bowl of pomegranate seeds around the house for the holidays. (Pomegranate season is from September to February.) This past Thanksgiving I had Garrett show me exactly how to de-seed a pomegranate while I took pictures. And now I'm showing you so you won't be in the dark any more about how to eat this tasty little fruit.

Before you get started, know that pomegranate juice stains, so you might want to put on an apron. Also, use a plastic cutting board if you don't want to risk staining your wood ones. 
Step 1: Cut the top off the pomegranate, also called the crown.
Step 2: Score the rind in several places around the fruit. Make sure not to cut all the way through. 
Step 3: Submerge the pomegranate in a bowl of water. Using both hands, break the pomegranate apart. If you soak it for five minutes or so it will be easier to break apart, but we didn't soak ours. By doing this step under water you don't have to worry about the juice squirting and staining.
 
Step 4: While under water, use your hand to separate the seeds from the membrane. The seeds will sink to the bottom and the rind will float to the top. Once all the seeds have been removed, scoop out the rind and drain the seeds into a collander.
That's it! They are ready to eat. These little seeds are a perfect combo of sweet and tart, very juicy, and have tons of flavor! You can store them in an air tight container in the refrigerator for up to two days.

Sunday, December 12, 2010

Cookie Tins


I have been passing out some Christmas goodies this past week and wanted to share a quick idea for using a tin. I bought some tins at the end of the season last year and was excited to fill them with a variety of cookies. I think I mentioned that I went to a cookie exchange last week and I came home with seven dozen different cookies. I started to pile them into the tin, but I didn't think they looked very pretty and I thought the cookies might all get broken. I so made a little divider out of card stock! I just cut a long strip and folded it in the shape of an x. I then had four neat little sections to divide my cookies into. I lined the tin with parchment paper first, placed in the divider and loaded it up with goodies. Just a thought! Happy goodie giving.
Related Posts with Thumbnails